Neive’s Memory Quilt: 2

Before I went any further, I had to at least start thinking about the design of the quilt.  I’m not planning to have every little bit of the design finalised before I start, but I do need to have some idea of where I’m going.  I played about with the knit fabrics a bit, and I think that I’ll applique them onto a cotton background.  This should solve the stability issues and perhaps it will increase the longevity of the quilt.  Neive is two and a half, and I anticipate that this quilt is in for a tough ride!  I want her to be able to drag it about and use it throughout her childhood, and still be left with something decent she will want and be able to use as a teenager and adult.

I have done some experimenting with the fabrics, and created this 5 inch square, which I made into a coaster, as a sort of maquette.

Preliminary scrappy heart.

Preliminary scrappy heart.

Hearts are going to be a prominent feature of the design, and I don’t care if that sounds corny, the secret ingredient is love, got it? 🙂  At first I was going to use low volume patterned fabrics for the background, but I actually think it looks busier than I’d like.  I’ve been scouring the kona solids range, auditioning background colours.  Originally, I was looking for one background colour, but I got seduced by a muted palette and ended up ordering six colours.  (Hurry up, Mr Postman!)

I have also decided to include some song lyrics, from tunes that she and I both like.  As a family, (I’m one of seven sisters) music mattered a lot to us, and I can see this tradition carrying on in Neive.  So, after a few hours of arguing with photoshop, I think I’m ready to start the first nine patch!

Neive’s Memory Quilt.

SavedPicture-2014111133310.jpgFabric for Neive’s memory quilt.

I picked up the bag of Neive’s outgrown clothes before christmas, but since christmas gets in the way of everything, I didn’t get into it until the festivities were over.  With a memory quilt, a bit of extra effort is required to get to the start line. The first job was, of course, to cut up the clothes into usable bits.  I didn’t really go to town when cutting.  Rather than saving every last scrap of material, I was ruthless, just going for decent sized areas and discarding the rest.   There are cases where you might want to preserve everything which might possibly be usable, but kids go through clothes at a mile a minute, so if I need more there won’t be a problem.  This took quite a while, and everything still needs to be pressed properly, but at least I was in a better position to take stock of what I actually have to work with.

That said, I have no idea what is there in terms of fabric area, but it looks like plenty.  Unsurprisingly, there’s quite a lot of pink, some reds and quite a lot of blues, a bit of denim, including a lime green I’m quite partial to, and a lot of very pale or white fabrics.  Most of the fabrics are cotton knit t shirt or fine jerseys.  I’ve not worked with these types of fabrics before in terms of quilting, but I have modified a few t shirts, and they are awkward to work with because they lack stability.  I want to take this into account when thinking about the design for this quilt, which is the next step!


Finished! – Oliver’s Super Nine.

Oliver’s quilt was finished just in time for me to wrap it before we went to my sister’s for christmas day breakfast.  It is one of my goals to get projects finished, and finished on time.  My mother, although a talented seamstress, was either always rushing to get projects finished, or never finishing them at all.  I think this is one of the things that put me off sewing for such a long time; finishing a project seemed almost impossible to me!  But, guess what?  Completing a project isn’t that difficult, as long as I remember, all together now, that finished is better than perfect.

Oliver’s quilt certainly isn’t perfect, but I do like the way it has turned out.  There were some surprises during it’s construction, but, hey, it wouldn’t do if everything ran smoothly.  The batting, which I got from the local crafty type shop, shrank more than my expected 5%. It was nice batting to work with though, dense with not very high loft. I would use it again, keeping it’s shrinkage in mind.
To construct the quilt, I used this ‘quilt as you go’ method from Maureen Cracknell.  (That’s a link to her blog, btw, which I love.  Her use of colour is just delicious.  Drop by and have a read.)  I’ve never done any quilt as you go before, and there are some things I would do differently. Rookie mistakes I’m sure. The first mistake I made was that my quilting wasn’t evenly spaced on each block. (This seems such an obvious error now, I can’t believe I didn’t take it into consideration. duh.) This resulted in the blocks looking different and having a different sort of ‘pull’ on them. This method calls for the back to be attached after the quilting is done and the blocks are joined, which I think is an inherently good idea. However, the large amount this particular batting shrunk meant that the backing turned out much ‘baggier’ than I would have liked. Maybe next time, if I’m using this batting, I will try shrinking the top and batting sandwich before attaching the back. That way, I can have the crinkling and a smooth back. Despite these problems, I think Maureen’s method is a good one, and I will use it again. I’m planning to use it to practice free motion quilting, as I can use manoeuvrable blocks, rather than attempting to manhandle a whole quilt top right off the bat. Also, this way, I am not risking wrecking an entire, basted quilt top and all the time invested in it. If I am not happy with a block, well, it’s only one block.
After a couple of washes, it was lovely a soft, and I hope Ceri and Oliver get lots of cuddle time with it!

Oliver’s Super Nine – Making Progress

I’m making good progress with Oliver’s quilt. I accidentally came across a quilt as you go method from Maureen Cracknell that I really liked, and this quilt seemed ideal to try it out on. Basically, you quilt the blocks to the batting and then sew all the blocks together. She then bastes the backing on and quilts it beside the seams where the quilt is joined. On paper, this method seems to have a lot of advantages. Five blocks out of the nine have now been quilted, and the backing and binding fabrics I ordered on Monday came today, so if I’m not finished in time for Christmas, there is something wrong!

Project Roundup!

Since I haven’t done any quilting since I got back from my holiday (that was the beginning of October!) I think it would be a good idea to take stock of the situation and see what needs to be done.  So, here’s my list of quilting projects and the stage they are at:

1.  Oliver’s quilt: Piecing the top.  Need to decide on design for the reverse of the quilt.

2.  Dinosaur quilt:  Top pieced, material for back ready.  Time to baste.

3.  Pink hearts quilt.  Top pieced.  Decide what is to be on the reverse. Baste.

4. Neive’s Memory Quilt:  Technically, this project isn’t started yet, but I’m putting it here so it doesn’t fall by the wayside.  I asked my little sister to collect clothes my niece, age now two and a half, has grown out of, to have a go at making a memory for her grown up bed.  I keep forgetting to pick up the bag of clothes when I visit.

So, my to do list for quilting looks like this:

1.  Clear workspace.

2.  Locate unfinished objects.

3.  Collect bag of clothes and have a look and see what we’ve got.

I finally managed to give Red Scatter Squares to it’s new owner and she, well, her mother anyway, is delighted with it.   In fact, she mentioned matching cot bumpers!  This has given me a much needed boost in confidence, and spurred me on to keep on quilting.  Once I locate the projects, I’ll get some photos.

P.S. A new project has reared it’s ugly head:  Folders!  I didn’t think at first that this was going to be a quilting project, but now I think it has enough of a quilting element to be included here.  I want to create a travel journal for my sister in law for christmas, and I think the way to go is by starting with an A5 ring binder. (here’s the pinterest board of ideas I’ve collected.)  This way it will be fully customizable, and pf course, I can cover it in some delicious fabric.  To this end, I ordered some fat quarters of Michael Miller’s forest range, which I’ve been admiring for ages.  If this works, I’ve got a load of ideas for other, similar, projects I want to create.

Oliver’s Super Nine: progress report.

The final selection of fabrics for baby Oliver's quilt.

The final selection of fabrics for baby Oliver’s quilt.

It would seem that the chevron with the green (Riley Blake C2923) in it really got to me because I decided to use it after all.  I had intended that to stick to the orange/aqua palette, but I think green can make an excellent ‘popper’, as it enhances a lot of other colours.  With this in mind, I also added the spotty fabric, (Riley Blake C2952) which I bought a while ago and was itching to use.   The final selection is, from top to bottom:

1.  DC5390 from ‘Lush’ by Patty Young for Michael Miller Fabrics.

2.  ‘Sage’ from the Kona solids range.

3.  PWAT 76 Chevron from Westminster Fabrics.  (the blue chevron that I had to leave behind was from the same range)

4.  C2952 from the ‘Puppy Park’ range from Riley Blake

5.  CX-4834 Tiny Gingham in Aqua from Michael Miller Fabrics

6.  35371-1 from the ‘Glimma’ range by Lotta Jansdotter for Windham Fabrics

7.  I have no idea! There wasn’t enough selvage to tell and I didn’t pay attention in the shop. 😦

8.  35377 from the ‘Glimma’ range by Lotta Jansdotter for Windham Fabrics

9.  C2923 From ‘Dress up days’ by Doohikey Designs for Riley Blake

I think the aquas are taking a backseat to the oranges and the coloured fabrics, but that’s ok.  I knew I was going to do some sort of nine patch, but some playing about convinced me that white sashing would show off the fabrics nicely:

I was just taking a photo to show you all the fabrics properly when I took this, but it convinced me to go with white sashing.

I was just taking a photo to show you all the fabrics properly when I took this, but it convinced me to go with white sashing.

Here's a finished block.  Five down, three to go.

Here’s a finished block. Five down, three to go.

So, all I have to do now is decide how I’m going to arrange the blocks and what I’m going to to for backing, then it’s quilting time!

Hope you’re all having a great weekend.

Ro.

P.S. WordPress is being very badly behaved today, and won’t do what it’s told at all!

Oliver’s quilt, part one.

Obviously, the first and most logical thing to do when in the process of a sewing room revamp is to …. go and buy some delicious fabric!

orange and aqua stack

This was the final pick, after much umming and erring, from today’s trip to the shop. I had to leave a blue chevron and an amazing red/orange circle fabric behind. 😦 The multicoloured chevron was a last minute pick up at the counter, where they have baskets of fat quarters to make impulse purchases that much easier! These fabrics are destined to be part of a quilt for my brand new nephew, Oliver, who was born yesterday at the same time as I was umming and erring. Of course, now that I’ve got my precious fabrics home, I’ve completely changed my mind about the design of the quilt and I’m going to have to raid my (limited) stash to find some more coordinates. (I feel like a proper quilter!). I’m itching to get started.

Finished!

red scatter squares

Red Scatter Squares is finished! Well, apart from a run through the washing machine and the tumble dryer. There will be some shrinkage, which is fine, but I am slightly worried. I think I should have washed it before I put the binding on. What way round do people normally do it? :-/ I want the soft, crinkly antique look, but I don’t want to sacrifice crisp edges and corners to get it. It’s too late for this one, but next time I think I’ll wash first. Apart from that, I’m pretty pleased with it. It’s not perfect, but I improved a lot and learned a lot through making it. Besides, finished is better than perfect anyway. Here’s the back:

Red scatter squares reverseI didn’t want a plain backing, but I’m not ready to do a pieced back, although I love the way they look. This quilt is about 45 inches square (final measurements when it comes out of the drier!) and is destined to be a gift for my friend Carole’s little girl, who is due any day now. I like the distribution of colour, and I think I will try this again with a braver palette. I’ve been playing around with building palettes lately, it’s great fun and a fine way to waste time, so I’ve got a couple of ideas.

Next week, I have to get my sewing room in order. At the moment, it is more of an office I set my sewing machine up in, but I’m going to change it round to more sewing space first and office second. There was a catalyst for the rearrangement, but I’m keeping it a secret for a little bit longer. What’s your sewing space like?

Update: The quilt came out of the dryer just fine. The binding is nicely crinkled, but it isn’t distorting the quilt any! 🙂

Have a great day!

P.S. Comments are always welcome. 😀

Simple quilt block tutorial round up.

One of the things that I love about quilting is that, even with a limited skill set, the possibilities are endless.  So far, I haven’t ventured beyond straight lines and right angles, but there are endless possibilities even for those who never want to attempt a curve or a triangle.  Here is a round up of some of my favourite, free, straight line, block tutorials.

Square in Square:

square in square

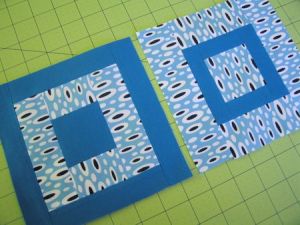
Here’s a basic one explained by Elizabeth Hartman over at her blog, Oh Fransson! (A blog well worth following, by the way)  A few small tweaks, such as varying the widths of the fabric or using ‘wonky’ cutting can totally change the look of this block.

Log Cabin Block

log cabin block

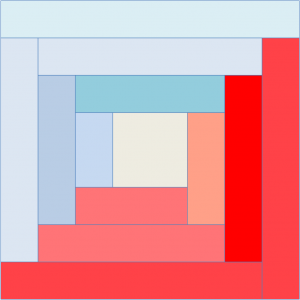
The log cabin block is one step up from the square in square, and although it is a traditional design, it is still a firm favourite. Use of modern fabrics instantly bring it up to date and if that’s not enough, creative piecing using negative space certainly gives it a kick.  Of course, varying fabric widths or using ‘wonky’ cutting can again result in different looks.  Google ‘modern log cabin quilt’ for some ideas.  (Man, I really need pinterest to expand on these things)  Rita Hodge of Red Pepper Quilts (I love her use of shape and colour!) tells you how to get to grips with this one.

Flying Squares Block

flying squares block

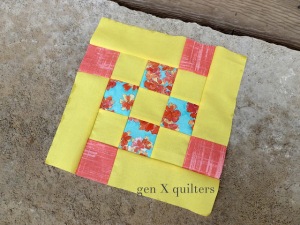
Ann Marie at Gen X quilters developed this nifty little patch to showcase some prints she loved. Don’t be fooled by that saltire at the top of her page, she’s in America! I’ve just come across her blog (there are so many out there) and it’s looking set to become one of my favourites. This tutorial shows that it’s fun to play around and look for the effect you want.  Another great thing about quilting is that quilters are always looking for new twists in the ways they bring fabrics together.

Stained Glass Block

stained glass window

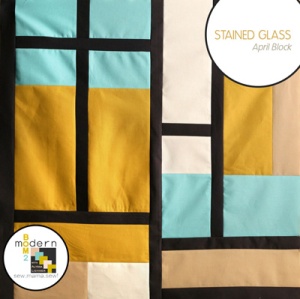
I couldn’t understand where the ‘stained glass’ name came from, until I remembered that churches in the states aren’t generally as old as they are here!  I live in a new town too, and the church DOES have stained glass windows just like this, but the church of my childhood was very different.  One day I might design a block based on it’s windows, all rich blues and reds with an arc at the top.

This block is featured as part of a sew along at Sew Mama Sew, and at the bottom of the post there is even a pdf download available.  (I love the internet!)  The blocks are designed by Alyssa Lichner, from Pile o’Fabric, who is guest blogging the series at Sew Mama Sew, which is jam packed with all manner of crafty good stuff, and, of course, you’ll be wanting to keep an eye out there for the rest of the blocks in the series! 🙂  Alyssa’s own blog is well worth checking out too, I especially love her bold fabric combinations and her weekly stash share, where she challenges readers to assemble a bundle of fabrics from a particular colour scheme.

Chunky Pinwheel

Chunky pinwheel

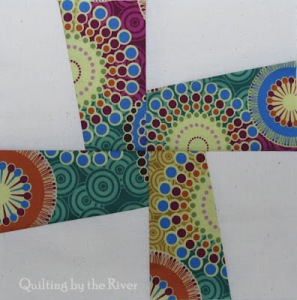
One favourite trick of modern quilters is to use off-square cuts.  (I can’t think of a better way to describe what I mean, even though I’m sure it’s not quite accurate!) Here’s a lovely, simple pinwheel block that I can’t wait to have a go at, put together by Connie at Freemotion by the River. In fact, it’s actually a whole quilt tutorial.  I think the white background and simple geometric design really shows off those fabrics.

Scrappy Cross

Scrappy cross

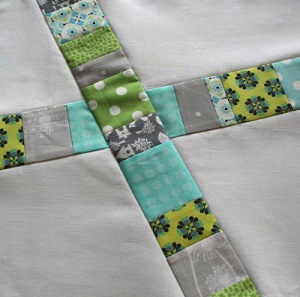
I’ve noticed a lot of quilts featuring crosses, and anything ‘scrappy’ is a great way to use up those tiny leftovers.  Fabric is such a precious commodity, and not just in monetary terms, that quilters are often loathe to part with even the smallest scraps.  I like that, it’s almost a homage to all the quilters of generations gone by, who used and reused fabric from other sources and still created something beautiful.  Quilting is, in my opinion, an art, but it has got it’s feet firmly on the ground.

This intuitive block is brought to you by Charlotte at Lawson and Lotti, and, as she says, it could easily be built up into something more complex, or scaled up to make a whole quilt.


All the above blogs have other tutorials posted, this is just a jumping off point.  Have a rummage, find something you like, have a go!

Perhaps you already have a favourite block?  Or maybe you have little tricks you use to personalise a block?  Let me know in the comments, I’d love to hear!
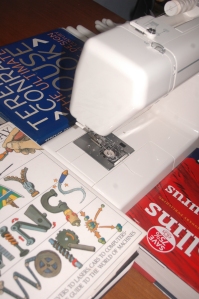
 

Walking Foot Success!

The walking foot (cheap generic from ebay, about £11.00) was a roaring success, lovely even stitches with a minimum of fuss.  It was very easy to fit as well.  I have also developed a method for keeping the weight of the quilt from dragging on the machine, and corrupting my stitches.  It involves an ironing board and a lot of books.  (Big books, including the Harley Davidson encyclopedia, a Collins thesaurus and the Encyclopedia of Photography.) These are stacked round the sewing machine to form a platform, as I do not yet own a sewing machine table, and are working pretty well,  (Kindles are ace, but there are some things they just can’t do!)  spreading the weight of the quilt.

DSC_0020

The sewing machine itself is on the dining room table, and I’ve got the ironing board set up level with it to my left.  It’s all a bit Heath Robinson, I know, but I have to work with what I’ve got at the moment, and, notwithstanding human error, I’m pretty pleased with the results.  I do need to find a way to get a sewing machine table and a machine with a bigger harp space (even one or two inches can make a massive difference) which are within my budget.

Here’s the commandeered Janome 150 of my mother with the walking foot attached:

DSC_0021

From the front we can see the cause of some of my human error:

The needle is positioned nearer to the right hand side of the foot, as we are looking at it, than the left.  This doesn’t cause any problems in sewing, but it did cause me some confusion as to  why my lines of stitching were inconsistently spaced.  Once I worked it out, the results improved greatly!

DSC_0025